
Getting started
What will you need?
We have aimed to keep the requirements for contributing data to this survey as simple as possible. The key items required are either a mobile device (iOS, Android or browser) with a camera, or a computer (Windows or Mac) with our app installed or through and internet browser, and a digital camera for taking photos in the field. Mobile data or Wi-Fi is required for uploading surveys.
You can download the app and survey here.
To make accurate records a mobile device with GPS is preferable, as this allows the capture of location and images in the field directly into the app.
There are a few other bits of additional kit that are not essential but can improve the quality of your records:
- A 10 m surveyors tape measure (flexible), for taking accurate girth measurements.
- A coin or small ruler for placing in photographs next to fungal fruit bodies to provide scale.
- A good field guide to fungi for clarifying your identifications .
How long does it take to submit a record?
During our testing period we have found that submitting a record in the field takes between 5 and 15 minutes per tree, depending on the number of species of fungi present. The greater the number of fungi the longer it can take.
For those that have the skills to work with fungi that are more difficult to identify, which will often require microscopic examination, the time can be much greater.
We are as interested in the common and easily identifiable fungi as we are in the under recorded and unusual species. We are very grateful for any contribution you feel able to make.
Where and when to look for oaks and fungi
Oak trees can be found in almost all parts of the UK, in urban and rural situations. Gathering information on oaks and their fungi in a diverse range of habitats and geographical locations will help us to build a better picture of how they are interacting in different scenarios.
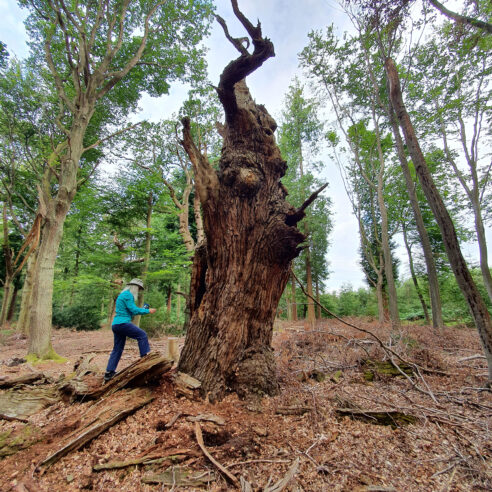
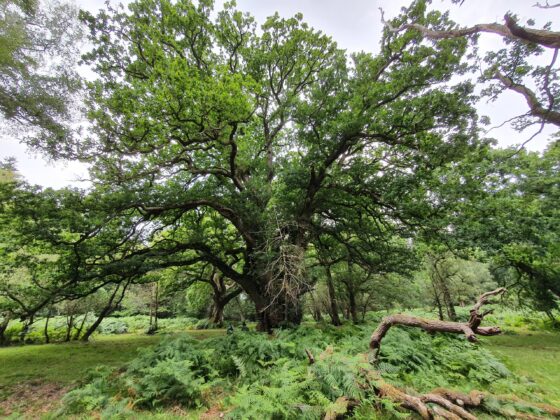
Many hedgerows, parks, fields, and woodlands host oaks of all ages, from tender saplings to gnarled ancient giants. We are interested in any of them that have observable fungi on, in or around them.
This survey will focus on standing oaks only, both dead and alive. This is because we are particularly interested in the communities of fungi that affect the tree while it is standing and the additional micro-habitats that this creates. Many of these habitats are retained for some time after a tree dies if it remains standing, but things get a lot more complex and less clear in felled trees, which would require a whole other project in its own right.
Observations of fungi on oak trees can be made all year round. Most fungi have their own season, which means for us to capture a snapshot of current diversity we will require records throughout the year. Some fungi will produce rapidly growing fruit bodies that will disappear in a few days, others, like many of the bracket fungi that can rot heart-wood, have perennial fruitbodies that can be present for several years.
Whether on a wintery walk in the woods or coming home with the shopping through the park, there will be the opportunity to observe fungi in action on oaks. Once you start to notice oaks in the landscape it does not take long to find one that has some form of fungus present. We would be delighted to hear about it when you do.
Try out the Ancient Tree Inventory as a way of locating veteran and ancient oaks in your area.
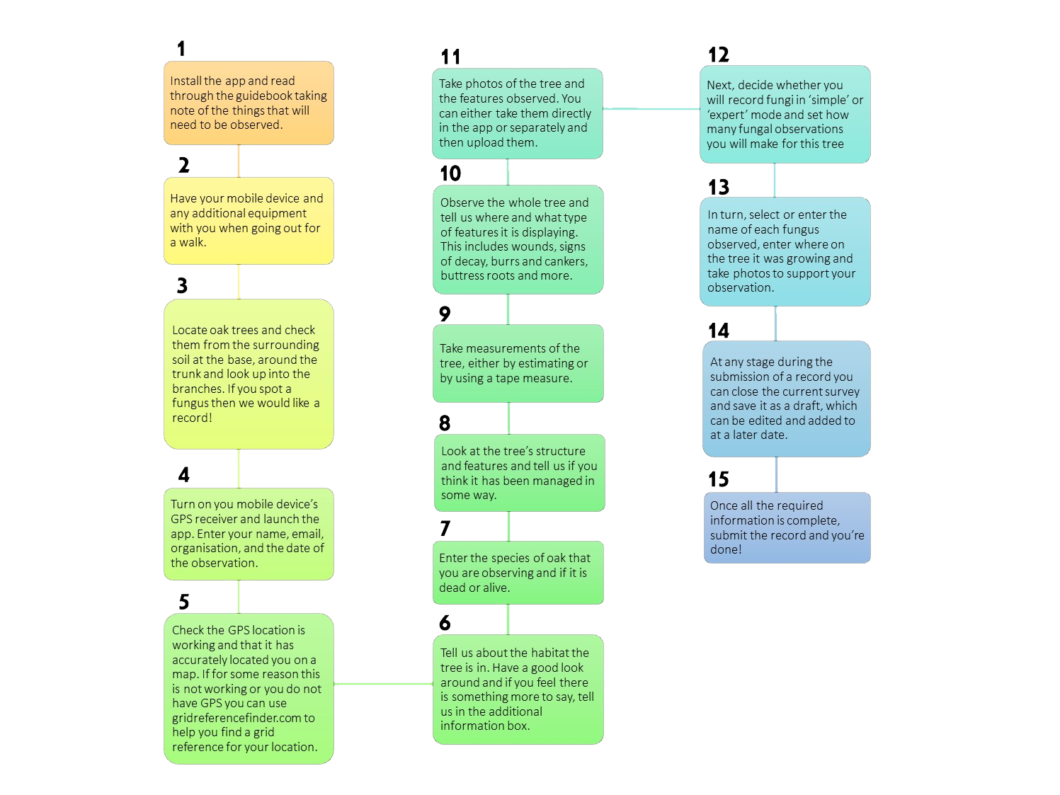
Workflow for submitting a survey
Setting up the Standing Oak Tree Survey app
The Standing Oak Tree Fungus Survey has been designed using Survey123 to work on mobile devices and from an internet connected browser. The following sections will cover the installation and setup for the Survey123 app and the downloading of the Standing Oak Tree Fungus Survey.
Mobile devices
The mobile app is perhaps the most straight forward for users, due to its ability to access the mobile device’s camera and GPS functionality, allowing these key data to be captured in the field and for additional information to be added or existing information to be edited later. The app operates on Android and iOS platforms.
- The Survey123 field app is available from Google Play and the Mac App Store. You can install Survey123 directly onto your device from either of these stores. You can also follow the link below to download the app.
- Once the app is installed, follow this link from your mobile device to download the Standing Oak Tree Fungus Survey: https://arcg.is/04aC9y
- Select ‘Open in the Survey123 field app’ and the Standing Oak Tree Survey will begin to download.
You do not need a username and password to use the app. If you open the link above, you will see a screen like this appear in your browser:
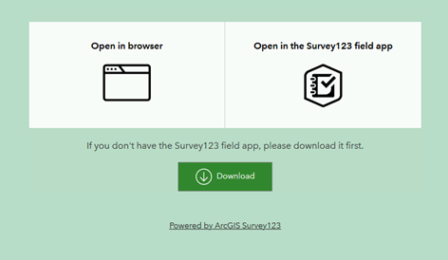
When launching the Survey123 app, you will see a sign in screen. There is no need to sign in, so select ‘Continue without signing in’ to enter the ‘My Surveys’ page.
Once you have the Survey123 app installed and the Standing Oak Tree Survey downloaded, you can begin entering observation data. The questions and their format are identical on all platforms. Please take your time and good care when entering information. Please ensure spellings are correct, especially of scientific names when using expert mode. You can check these by making a Google search or looking in Species Fungorum if you are unsure.
To begin, select the ‘Standing Oak Tree Survey’ from the ‘My Surveys’ page. This will open the survey and you can then press the blue ‘collect’ button to start adding data.

Getting the Most Out of the App
When using the Survey123 field app there are additional features that can help to streamline your user experience. In this section we will look at some of the app’s functionality.
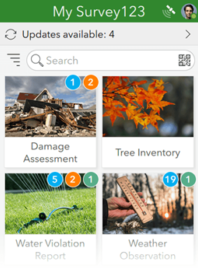
My Surveys
This is the home page of the app. If you are only using the Standing Oak Tree Fungus Survey, then this will be the only survey with its icon displayed here.
Numbers in the corner of a survey’s icon indicate unfinished or unsent results. If there are unfinished draft entries, the number of drafts will be listed in an orange circle, while the surveys queued to be sent later in the survey’s outbox are numbered in a green circle.
A bar at the top of the page will show the number of updates available. Selecting this bar will open the Update Surveys page and will allow you to update to the latest version.
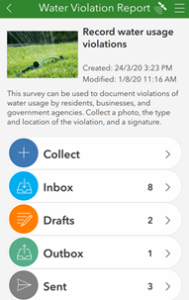
Survey contents
The survey contents page can be accessed by selecting a survey from the My Survey123 page. Here, you can start collecting new data or access previously collected surveys.
The options on this page are as follows:
Collect – Opens a new, blank survey page for inputting data.
Drafts – Opens to a form currently left uncompleted by closing the survey before sending it.
Outbox – Opens to a listing of all forms finished but unsent, either by choice or because the device was offline when submitting.
Sent – Contains the records of all forms submitted to us.
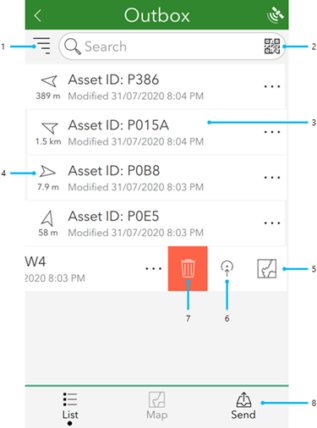
The Drafts, Outbox, Sent, and Inbox pages have similar layouts, with standardized buttons and functions. The following image is of the Outbox page but be aware that all three pages look and behave similarly.
The options on these pages are as follows:
- The sorting options allow you to list the responses by alphabetical order, submission date, or distance.
- Search for values contained in existing records. If a single result is found, the app will load the survey with all existing answers from that record already filled in. Otherwise, the app will show a list of all results found.
- Select a record to open it, either to edit the existing response, view, or create a copy. The available actions will vary depending on which folder you are in.
- These indicators show the distance and direction from your device’s location to the record and will update as you move.
- The Map button opens a map of all records, centred on the selected record.
- If the record has a valid location, this button will allow you to open another app to navigate to this point.
- Delete deletes the record from your device.
- The Send button on the Outbox page submits all records currently listed in it. This button does not exist on the Sent page; however, the Sent page instead has an Empty button, which clears the listing of all sent records. It does not delete the surveys from our data.
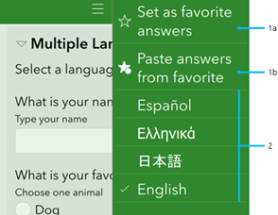
Favourite answers
To create a set of favourite answers that you can reuse, first complete a survey with your preferred answers. Then use the Menu button to select Set as favourite answers (1a) before submitting it. This saved survey is now marked with a star icon in the Sent list, and the Paste answers from favourite option becomes visible on the menu bar in a new survey (1b). This menu option will apply your favourite answers to the current survey automatically.
Note:
Favourite answers are saved as a marker on the sent survey, signified by a gold star on their entry on the Sent page. If this survey is deleted from your device, the favourite answers will also be deleted. Favourite answers do not include location values.
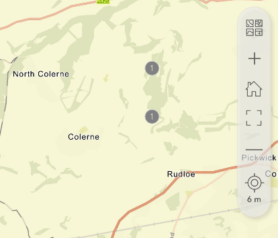
Viewing your records
As mentioned above you can view your own records in your sent folder (or drafts). They will appear as a list and each can be opened and checked individually. You can also view all of the records on a map, which is helpful if you want to see how well you have covered a particular area or if you had recorded from a tree at a previous time.You can update records from here with new information. This means that if you make a new fungal observation on a previously recorded tree, you can open the record and add the new observation and reupload the survey.
Your information
In this section we will collect information about you, the collector, and the collection you have made.
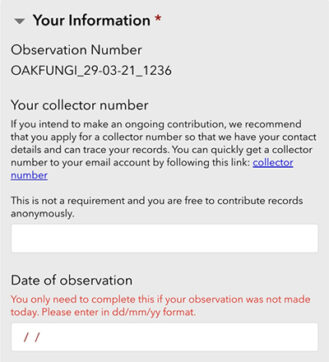
Collections number
This is an automatically generated identifier for your observation, and you do not need to enter anything here. We use this to find records quickly.
Your collector number
If you intend to make an ongoing contribution, we recommend that you apply for a collector number so that we have your contact details and can trace your records. You can quickly get a collector number to your email account by following this link: collector number.
This is not a requirement and you are free to contribute records anonymously by submitting records without a collector number.
Date of observation
This is not a required field as the date of a submission for records made in the app is included in the automatically generated collections code, discussed above. However, if you are submitting a record from your own historical data (from records or photos that you’ve taken before having the app) then you can add the correct date of the observation here.
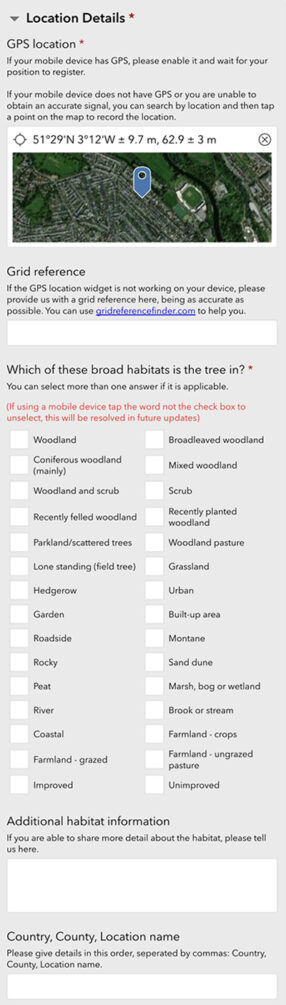
Location details
The location at which the observation was made is of great value when it comes to conservation assessment, understanding distribution and many other uses. Our app can utilise the GPS location provided on mobile devices and allows the manual selection of a location on a range of different base maps.
GPS Location
If you are using a mobile device in the field, please turn on your location service and your GPS location will update automatically. If you cannot use GPS location or you are entering the record away from the collection site, please select the location using the map tool.
By clicking or tapping on the GPS location widget you can enlarge the map view. From here you can select other types of base map, search by place name and right click or press and drag to drop a pin on the exact location of the collection. This can also be done to override an inaccurate GPS location.
There is a currently known bug with this GPS widget on older versions of Safari and Apple devices. If the widget does not display correctly or does not load, please provide us with a grid reference using the entry below.
Grid reference
If you are having difficulty using the GPS location widget, which is known currently to have loading issues on some older devices, then please tell us the grid reference at which the collection was made. The grid reference should use the Ordnance Survey National Grid reference system. You can use www.gridreferencefinder.com to assist you with obtaining an accurate grid reference. This web map service is searchable by location name, postcode, and other methods. A precise location can then be found using the aerial photography layer.
Habitat
Providing information about the habitat in which the tree and fungus have been found is very valuable. This can help us understand the range of each species, where they prefer to grow and if this is changing, all things that can contribute to fungal conservation.
Select a habitat from the multiple-choice boxes. The list comprises of a simplified selection of broad habitats. You can select more than one answer to give a more accurate indication. E.g. “Improved + Grassland” or “Broadleaved woodland + River”
Woodland Built-up area
Broadleaved woodland Roadside
Coniferous woodland (mainly)
Montane
Mixed woodland Rocky
Woodland and scrub Sand dune
Scrub Peat
Recently felled woodland Marsh, bog or wetland
Recently planted woodland River
Parkland/scattered trees Brook or stream
Lone standing (field tree) Coastal
Grassland Farmland – crops
Hedgerow Farmland – grazed
Urban Farmland – ungrazed pasture
Garden Improved
Additional habitat information
If there is something more about the habitat that you would like to tell us, enter the detail here.
Country, county, location name
Please give details in this order, separated by commas: country, county, and the closest location name. Location names can be found on Ordinance Survey maps.
e.g. Wales, Vale of Glamorgan, Merthyr Mawr.
Information about the oak tree
In this section we would like you to provide us with as much information about the oak tree as possible.
Which species of oak are you recording?
Our focus is on native oak trees, The pedunculate oak (Quercus robur) and the sessile oak (Quercus petraea). Select which species you are recording. If you are recording on a non-native oak or hybrid and you are sure of the identification, please select it from the drop-down box or type the scientific name into the ‘Other species’ box. You can find more information on how to identify the native species in the ‘Identifying oaks’ section of this guide.
If you are unsure of the oak species, please choose the ‘I’m not sure!’ option and take a photo of the leaves, and if possible, the acorns, while still attached to the tree. Upload it with the other tree images at the bottom of this section, to help us with identification.
Oak species options include:
Quercus robur (Pedunculate Oak)
Quercus petraea (Sessile Oak)
Quercus x rosacea (Hybrid Oak)
Quercus ilex (Holm Oak)
Quercus rubra (Red Oak)
Quercus cerris (Turkey Oak)
Quercus coccinea (Scarlet Oak)
Quercus macranthera (Caucasian Oak)
Quercus ellipsoidalis (Northern Pin Oak
Quercus pyrenaica (Pyrenean Oak)
If you know when the tree was planted, please tell us how old it is
If you know from historical records or personal experience when the tree was planted, please tell us here. Estimates within a decade for older trees are acceptable, otherwise please leave this blank.
Is the tree alive or dead standing?
Check the tree for any sign of green leaves still attached in Spring or Summer. During winter this can sometimes be difficult to judge. If there are very large areas of lost bark or complete ring barking of the trunk, please indicate as dead. If you are unsure, please leave this question blank.
Has the tree been managed through coppicing, pollarding or monolithing, or does it have a particular growth style?
Trees can be pruned or managed in many ways, which will affect the overall form and development of the tree throughout its life. We are interested to know how this may affect the presence of different fungal species.
Being able to spot these management styles is a skill that takes a little understanding to develop. We have provided images to assist you with making a decision, but if in doubt answer, ‘I’m not sure’ and take some good photos from a distance.
Measurements
Measuring trees can be a little tricky! To make things more difficult, there are lots of different ways that can be used to measure trees. Please check carefully that you are following our guidelines for measuring, in particular that we are measuring at 1.5 metres (150 cm) above the ground level and all measurements are in centimetres (cm).
There are two options when submitting measurement data, either accurately measuring with a tape and providing us with the tree’s circumference or estimating the trees diameter using your body as a guide. Please only supply one set of measurements, either measured or estimated.
Some trees may not offer a simple way to measure, multi-stemmed trees for example. In these cases, you can enter several measurements separated by commas.
For trees that are heavily burred or unusually shaped, please make an approximate subtraction to give a true sense of the tree’s diameter, without burrs or cankers, at 1.5 m height from the ground.
For details on how to measure see the ‘Measuring trees’ section in this guide.
Where are the signs of decay, wounds, or entry points on the tree?
Look at the tree from butt to lower branches and let us know in which areas of the tree there are any signs of decay, entry points or wounds. We divided a tree into 4 main areas: butt, trunk, lowest branches, and higher branches. Please select all that apply or no visible signs if there is nothing present. See the next question for a list of the types of entry point.
Decay, wounds, entry points and features
Please select what types of decay, entry/exit points or wounds are present on this tree. Please select all that apply or select no visible signs if there is nothing observable. You can also select ‘other’ and provide us with further detail if your observation is not available on the list. The selections include:
Cut branch(es)
Reductions (pruned)
Decayed or dead attached branch(es)
Cracked branch(es)
Woodpecker holes
Insect galleries or bore holes
Broken trunk
Bark damage exposing cambium
Large wounds exposing heartwood (not hollows
Healed over wound
Small hollow (less than 20cm in any direction)
Medium hollow (greater than 20 cm up to 40 cm in any direction)
Large hollow (greater than 40 cm in any direction)
Lightning scar(s)
Fire scar(s)
Burr(s) or canker(s)
Damaged roots
Exposed root cavities
Water-filled hole(s) at base (Dendrotelm)
Stem bleed (dark coloured weeping fissures)
Buttress roots
Other information about the tree
You can use this box to give us any additional information about the tree that you think may be relevant.
Photos of the tree
Please provide one or more images of the tree, focusing on decay, wounds, and entry/exit points.
You can take a photo with your mobile device’s camera or upload an image. To submit more than one photo press one of the ‘+’ buttons that appears after adding a photo.
High-quality photographic documentation greatly improves the value of an observation and allows us to check for errors. Please take and select images that display the features as clearly as possible.
When adding images, you can do so either directly through the device’s camera, which is very useful if you are in the field, or by uploading a previously taken image from your devices file storage.
This button will open your devices camera to take an image in the field or ex situ. This is not so useful on desktop devices as it will access your webcam.
This button allows you to upload a file and will open your file browser to enable selection.
By uploading images to this survey, you are giving permission for your images to be used by our project under a Creative Commons Share Alike 4.0 license (CC SA 4.0). If we use the photo in any form of publication, we will ensure that you are credited where it is used.
For further advice on taking good quality and informative photos, please see the ‘taking photographs in the field’ section further on in this document.


Information about the fungi on the tree
In this section, please tell us about the fungi you have observed fruiting on the oak tree.
You can add multiple fungus observations to a tree by moving the slider to the right. We can accept between 1 and 10 species of fungi per tree. If you have managed to find more than 10 species, you can list them in the ‘Additional information’ field at the end of the survey.
If you are unsure of the identity of the fungus please select ‘I’m not sure!’ and take 2 clear photos that include all of the features, especially the underside where there may be gills or pores.
For help with identification see the ‘Key fungal species found on oak’ section or alternatively the TMA Fungi website or app.
You can either choose a species from the selection of key oak species with images in ‘simple’ mode, which is great for most quick records, or you can enter species by scientific name in ‘expert’ mode. Select which one you would prefer and then move the slider to set how many species of fungi you will be recording; this will increase or decrease the number of ‘Fungus observations’.
Fungus observations
Open each fungus observation in order, complete the section and then close it before moving onto the next one. If you are working in ‘simple’ mode you will see a selection of species names, check boxes and images. As before, you can press an image to enlarge it, to help with identification. If you are working in ‘expert’ mode, start typing the current species name in the first field and a list of possible species will appear to select from. If the species you have found is not listed, please tell us the species name in the field below.
Photos of the fungus
You can take a photo with your mobile device’s camera or upload an image. Please try and capture an image that shows the top and underside of the fungus, including the pore or gill layers. If this is not possible in a single shot, please add another image. You can also upload microscopic images if relevant, but please ensure they include a scale bar.If possible, place a coin or ruler in the photo for scale.To submit more than one photo press one of the ‘+’ buttons that appears after adding the first image.
When adding images, you can do so either directly through the device’s camera, which is very useful if you are in the field, or by
uploading a previously taken image from your devices file storage.

This button will open your device’s camera to take an image in the field or ex situ. This is not so
useful on desktop devices as it will access your webcam.

This button allows you to upload a file and will open your file browser to enable selection.
When moving on to add data to the next fungus observation section, we advise closing the previous section, as this will prevent the survey from jumping up the page when new images are added on the device. This is a known bug and one we hope will be resolved with updates by the platform developers soon.
By uploading images to this survey, you are giving permission for your images to be used by our project under a Creative Commons Share Alike 4.0 license (CC SA 4.0). If we use the photo in any form of publication, we will ensure that you are credited where it is used.
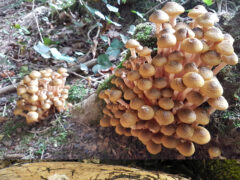
From how many points on the tree is this species fruiting?
For this question we would like you to count the number of separate clusters of fruitbodies that are growing from different points on the tree. This can help to give us an idea as to how colonised the wood is by this
species.
This Armillaria sp. (honey fungus) has lots of caps growing from 2 points (fasciculate growth). As all those caps are joined at the base, this would count as 2 points of growth, therefore the entry would be “2”.
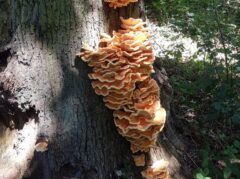
This Laetiporus sulphureus (chicken-of-the-woods) has lots of dense shelf like lobes that are conjoined. The conjoined fruitings are arising from 4 separate places.In this case, the entry for the number of points of fruiting
would be “4”.
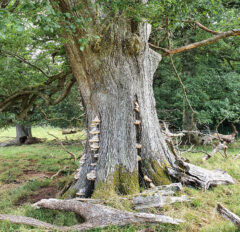
Many fungi on trees are likely to produce a single fruitbody, but there are always exceptions. These Oak Brackets (Pseudoinonotus dryadeus) are fruiting extensively from 45 separate points around the tree, made up of a total of 75 brackets. The brackets that were joined to another bracket were counted as a single point.The total number of points for this record is “45”.
Where are the fruitbodies on the tree?
Look at the tree from butt to lower branches and let us know in which areas of the tree there are fruit bodies for this species of fungus. We have divided a tree into 4 main areas; butt, trunk, lowest branches, and higher branches and additionally mycorrhizal species, which are most likely to be found on the soil around the tree.
Please only select mycorrhizal species if you are confident that the species in question is mycorrhizal and that it is associated with the tree that you are recording.
Select all that apply for this fungus.
Which part of the tree is the fungus growing on?
As well as which areas of the tree the fungus is found on, we would like to know more specific information. We have provided a selection of common options, if your observation does not fit any of these, select ‘other’ and tell us in the field below.
- On bark on trunk
- On rotten wood on butt
- On exposed wood on trunk
- On exposed roots
- On rotten wood on trunk
- On soil but attached to buried roots
- In hollow on trunk
- On bark on branches
- On moss on trunk
- On exposed wood on branches
- On dead trunk
- On dead branches
- On bark on butt
- On soil around the tree
- On exposed wood on butt
Additional fungus information
At the bottom of each ‘fungus observation’ section there is an area for any additional notes. You can tell us anything extra about the fungus here.
Additional information
This is a final additional notes section where you could tell us anything you think has been left out, including more species of fungi if you observed more than 10 for this tree.
All done!
Press the tick icon at the bottom right of the survey to submit your data. If you have not filled in some of the required information the survey will highlight your missing answers.
If everything is complete you will see the following options:
If you have a mobile data connection then choose ‘Send now’ to begin the upload, otherwise you can save in your outbox and send it when you have a data connection or access to Wi-Fi.